
It seems like everyone has at least one old bookcase taking up space in the garage. You resist getting rid of it because you know you’ll have a use for it one of these days.
Fortunately, revamping a tired bookcase isn’t as difficult as you might think. In fact, all you need are a few simple tools, a couple cans of paint and some decorative wood trim to restore that relic to greatness.

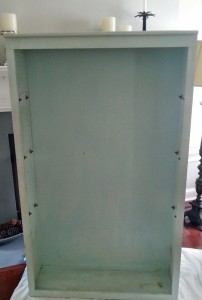
It has been dressed in its current shade of pale blue for well over a decade, and it also has about 10 years’ worth of grime covering it from top to bottom.
Start by cleaning your bookcase with a sturdy sponge and a bucket of hot, soapy water. This is absolutely essential to ensure that the new paint adheres. Make sure the shelves are completely dry before moving on.
While it dried, I used my miter saw to cut the trim. I used 2-1/4 in. wide strips of decorative wood trim traditionally used as chair railing. Make sure you purchase enough to entirely surround the opening of the bookcase and allow extra for the 45° angled miter cuts.

After cutting the four strips of trim, I painted the now-completely-dry bookcase using a two-tone technique. I painted the inside and all three shelves with the same color as the wall in the room, a soft silver gray. I painted the outside with a semi-glossy white used for trim.
Because both colors merge seamlessly with the existing colors in the room, the bookcase will serve as an unobtrusive addition to the space that will stand out rather than stick out. But because it’s dressed up beyond that of your typical bookcase, it will enhance the aesthetic appeal of the room while it serves an all-important storage function!
 After the outside white paint was dry, I laid the bookcase down on its back to make attaching the trim to the front easier. You can do this step manually using thin finishing nails and a hammer, or you can do what I did and attach them using a brad nailer.
Fit the pieces together like a picture frame in each of the corners and nail them in place. Don’t worry about the joint gap at this point because the paint will fill in any spaces to the point that you won’t even notice it once the bookcase is finished.
While the bookcase was still positioned on its back, I applied a couple of coats of the semi-gloss white to the new trim.

The final result is something that looks like it came from a high-end furniture store. And you would never guess by looking that it didn’t come pre-assembled with the outer trim already attached!
Don’t shy away from using leftover paint samples. I was able to employ the remainder of the original paint sample I used to test out the room’s wall color about a year ago. Because it comes in a satin finish, it will adhere to the furniture very well while adding a subtle surface sheen to elevate the look beyond that of a basic flat paint.
And all that’s left now is to stage the shelves. For the most professional looking result, avoid loading it up! In other words, only place items on it that serve a decorative or functional purpose or that you will actually use. Do your best to balance out the shelves and spread out your items evenly between sides; consider staggering them so that the right or left side isn’t more heavily stocked than the other.
 Visit us today at Paintway Toowoomba