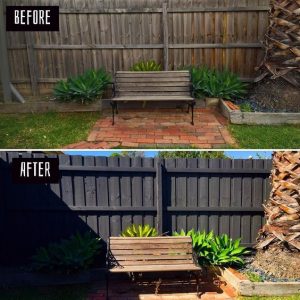
Does that fence Need an update? Here is how you go about it.
What you’ll need:
- A Specialised Paint Colour made to withstand the outside elements in your chosen sheen and colour
- Drop sheets
- Flat paddle paint stirrer
- Wide paint brush
- 10-12mm nap roller and tray
- Medium grit sandpaper
- Damp cloth
- Bucket for cleaning
Get Started:
- Prepare your fence by removing any bikes, cars or plants that are too close to the area. Brush away any dirt and lay down your drop sheet.
- Test if the paintwork is in good condition by cutting a small ‘X’ through the existing paint with a sharp blade, press cellulose tape firmly across the cut and then rip off the tape. If the paint comes off, it is unsound and should be removed. If the surface is sound, finish with a light but thorough sand.
- Make sure to sand back any small areas where the paint has peeled or cracked, and to fill and spot prime any larger holes and defects.
- Once you’ve sanded your picket fence, you can start painting straight away, Make sure your paint is self-priming on most surfaces.
- Open and stir your paint thoroughly, before loading your paint brush.
- To make painting your picket fence a breeze, start by painting the board that runs along the bottom of your fence with your paint brush. Be careful not to pick up any dirt from the ground.
- Then, paint the valleys where your roller can’t reach.
- Once you’ve painted all 3 sides of the valley with an even coat, you can use a roller in a vertical up and down motion, to paint the vertical panels.
- After you’ve finished painting the first coat, wait 2 hours before recoating. Once dry, follow the same process for a second coat. A third coat will need to be applied if the surface is bare timber.
Now – Stand Back and Admire!
")